AronaPro Developer Guide
Acknowledgements
AronaPro is based on the AddressBook Level 3(AB3) sample project created by the SE_EDU initiative under the CS2103T module in NUS School of Computing.
Setting up, getting started
Refer to the guide Setting up and getting started.
Design
Architecture

The Architecture Diagram given above explains the high-level design of the App.
Given below is a quick overview of main components and how they interact with each other.
Main components of the architecture
Main (consisting of classes Main and MainApp) is in charge of the app launch and shut down.
- At app launch, it initializes the other components in the correct sequence, and connects them up with each other.
- At shut down, it shuts down the other components and invokes cleanup methods where necessary.
The bulk of the app's work is done by the following four components:
UI: The UI of the App.Logic: The command executor.Model: Holds the data of the App in memory.Storage: Reads data from, and writes data to, the hard disk.
Commons represents a collection of classes used by multiple other components.
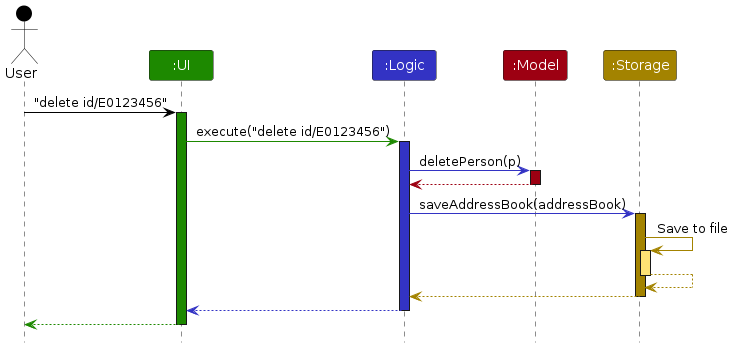
How the architecture components interact with each other
The Sequence Diagram below shows how the components interact with each other for the scenario where the user issues the command delete id/E0123456.
Each of the four main components (also shown in the diagram above),
- defines its API in an
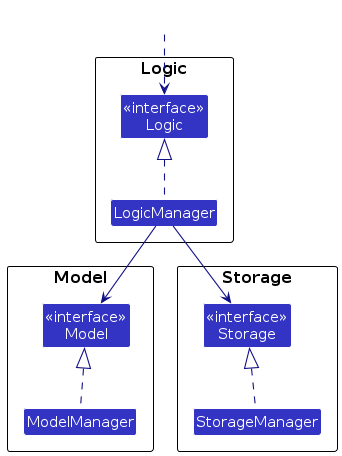
interfacewith the same name as the Component. - implements its functionality using a concrete
{Component Name}Managerclass (which follows the corresponding APIinterfacementioned in the previous point.
For example, the Logic component defines its API in the Logic.java interface and implements its functionality using the LogicManager.java class which follows the Logic interface. Other components interact with a given component through its interface rather than the concrete class (reason: to prevent outside component's being coupled to the implementation of a component), as illustrated in the (partial) class diagram below.
The sections below give more details of each component.
UI component
The API of this component is specified in Ui.java
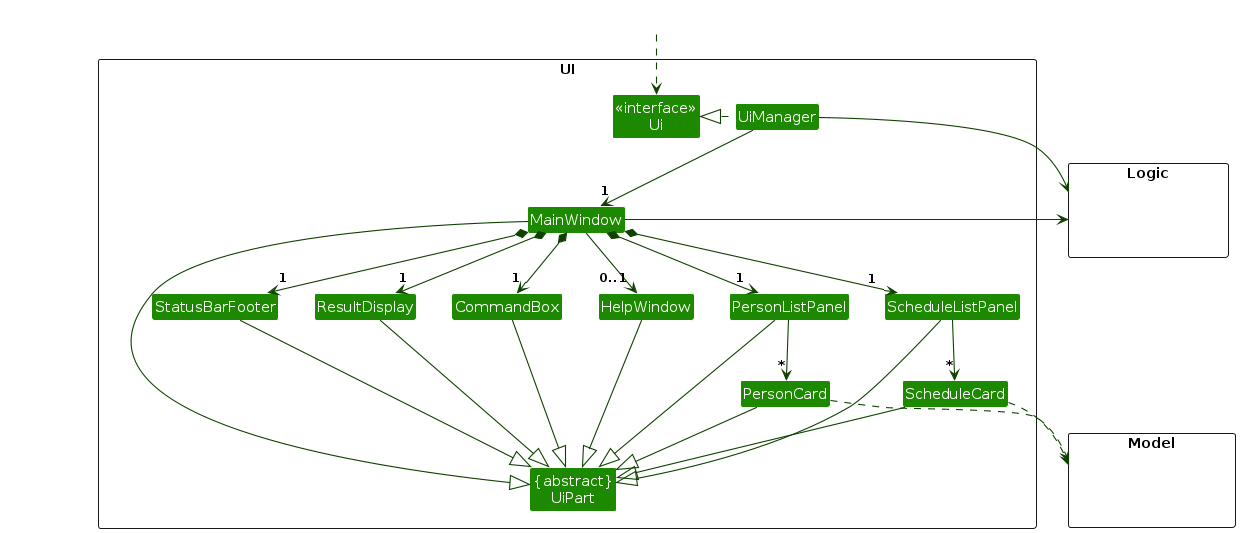
The UI consists of a MainWindow that is made up of parts e.g.CommandBox, ResultDisplay, PersonListPanel, ScheduleListPanel, StatusBarFooter etc. All these, including the MainWindow, inherit from the abstract UiPart class which captures the commonalities between classes that represent parts of the visible GUI.
The UI component uses the JavaFx UI framework. The layout of these UI parts are defined in matching .fxml files that are in the src/main/resources/view folder. For example, the layout of the MainWindow is specified in MainWindow.fxml
The UI component,
- executes user commands using the
Logiccomponent. - listens for changes to
Modeldata so that the UI can be updated with the modified data. - keeps a reference to the
Logiccomponent, because theUIrelies on theLogicto execute commands. - depends on some classes in the
Modelcomponent, as it displaysPersonobject residing in theModel.
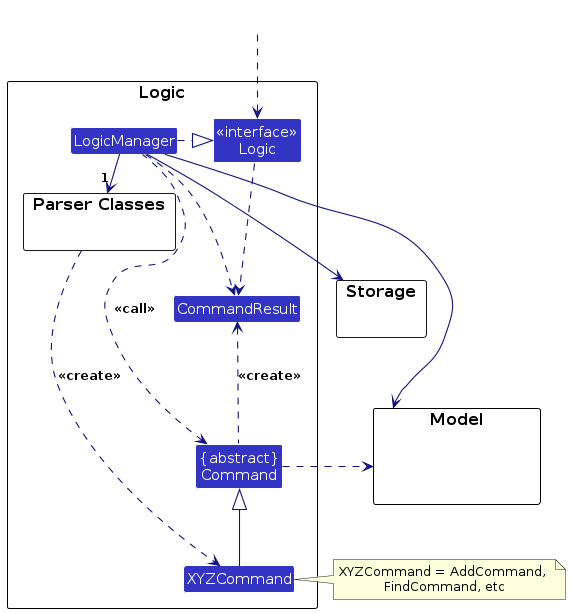
Logic component
API : Logic.java
Here's a (partial) class diagram of the Logic component:
The sequence diagram below illustrates the interactions within the Logic component, taking execute("delete id/E0123456") API call as an example.
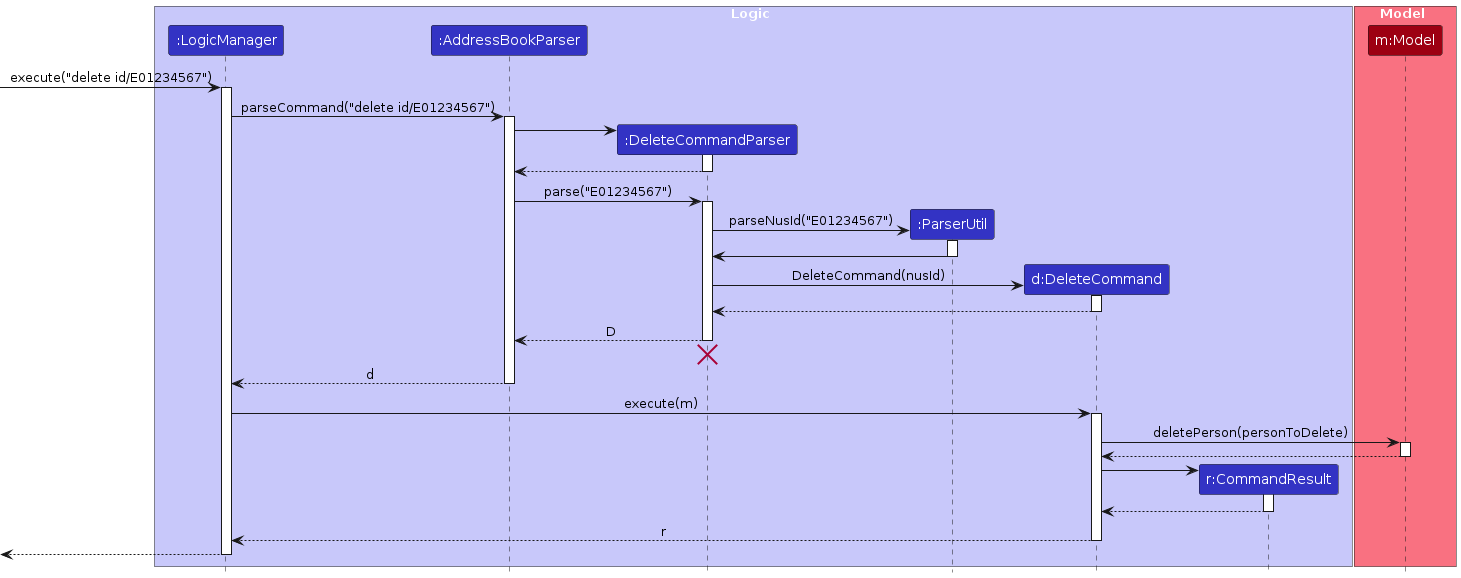
Note: The lifeline for DeleteCommandParser should end at the destroy marker (X) but due to a limitation of PlantUML, the lifeline continues till the end of diagram.
How the Logic component works:
- When
Logicis called upon to execute a command, it is passed to anAddressBookParserobject which in turn creates a parser that matches the command (e.g.,DeleteCommandParser) and uses it to parse the command. - This results in a
Commandobject (more precisely, an object of one of its subclasses e.g.,DeleteCommand) which is executed by theLogicManager. - The command can communicate with the
Modelwhen it is executed (e.g. to delete a person).
Note that although this is shown as a single step in the diagram above (for simplicity), in the code it can take several interactions (between the command object and theModel) to achieve. - The result of the command execution is encapsulated as a
CommandResultobject which is returned back fromLogic.
Here are the other classes in Logic (omitted from the class diagram above) that are used for parsing a user command:
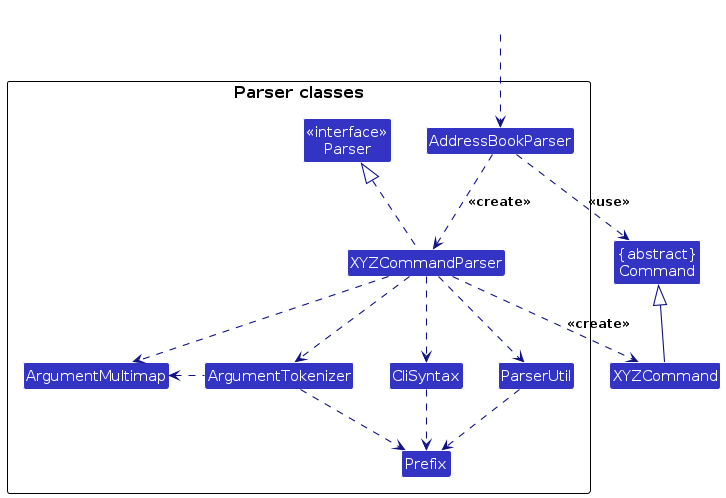
How the parsing works:
- When called upon to parse a user command, the
AddressBookParserclass creates anXYZCommandParser(XYZis a placeholder for the specific command name e.g.,AddCommandParser) which uses the other classes shown above to parse the user command and create aXYZCommandobject (e.g.,AddCommand) which theAddressBookParserreturns back as aCommandobject. - All
XYZCommandParserclasses (e.g.,AddCommandParser,DeleteCommandParser, ...) inherit from theParserinterface so that they can be treated similarly where possible e.g, during testing.
Model component
API : Model.java
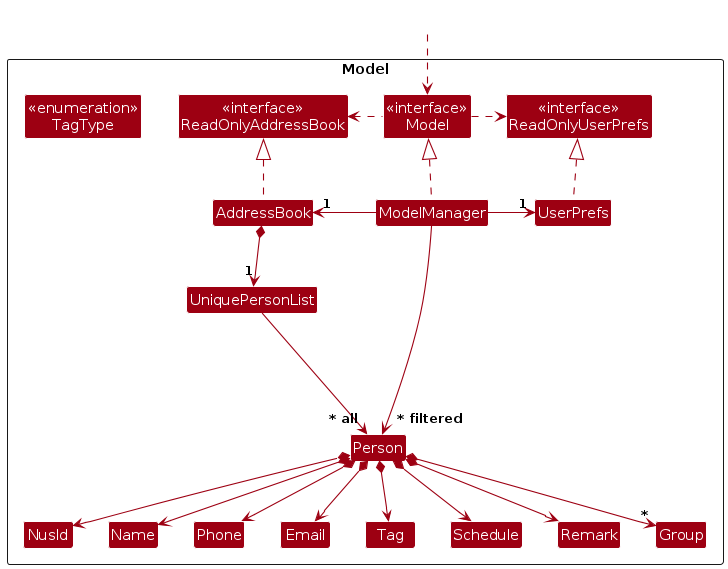
The Model component,
- stores the address book data i.e., all
Personobjects (which are contained in aUniquePersonListobject). - stores the currently 'selected'
Personobjects (e.g., results of a search query) as a separate filtered list which is exposed to outsiders as an unmodifiableObservableList<Person>that can be 'observed' e.g. the UI can be bound to this list so that the UI automatically updates when the data in the list change. - stores a
UserPrefobject that represents the user’s preferences. This is exposed to the outside as aReadOnlyUserPrefobjects. - does not depend on any of the other three components (as the
Modelrepresents data entities of the domain, they should make sense on their own without depending on other components)
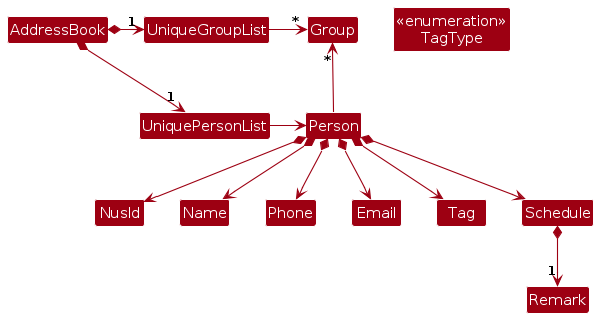
Note: An alternative (arguably, a more OOP) model is given below. It has a Group list in the AddressBook, which Person references. This allows AddressBook to only require one Group object per unique group, instead of each Person needing their own Group objects. Additionally, a Remark can also be encapsulated in the Schedule class to ensure more OOP-ness while allowing each Person to have multiple Schedules with its corresponding Remark
Storage component
API : Storage.java
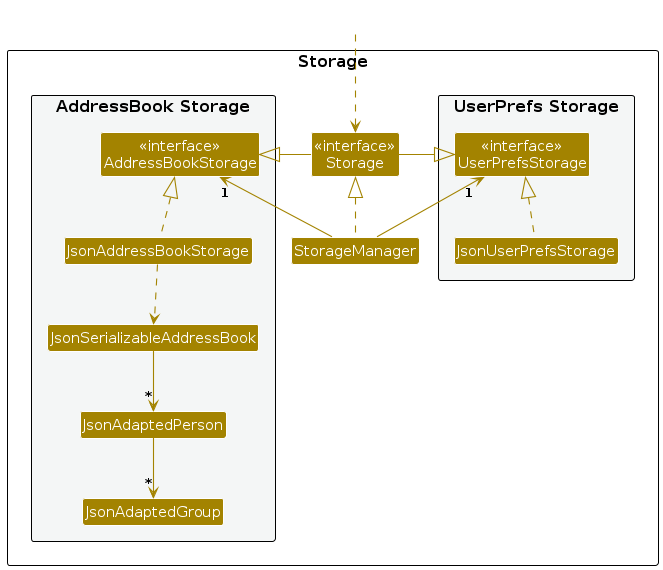
The Storage component,
- can save both address book data and user preference data in JSON format, and read them back into corresponding objects.
- inherits from both
AddressBookStorageandUserPrefStorage, which means it can be treated as either one (if only the functionality of only one is needed). - depends on some classes in the
Modelcomponent (because theStoragecomponent's job is to save/retrieve objects that belong to theModel)
Common classes
Classes used by multiple components are in the seedu.addressbook.commons package.
Implementation
This section describes some noteworthy details on how certain features are implemented.
Add feature
Add for a person can be added using the add command. The AddCommand class is responsible for handling the addition of a person. This command is implemented through AddCommand which extends the Command class.
A new Person can be added by specifying NUSID, name, phone, email, tags and optional group.
Note: There can be 0 or more optional group.
Implementation
Given below is an example usage scenario and how the AddCommand mechanism behaves at each step.
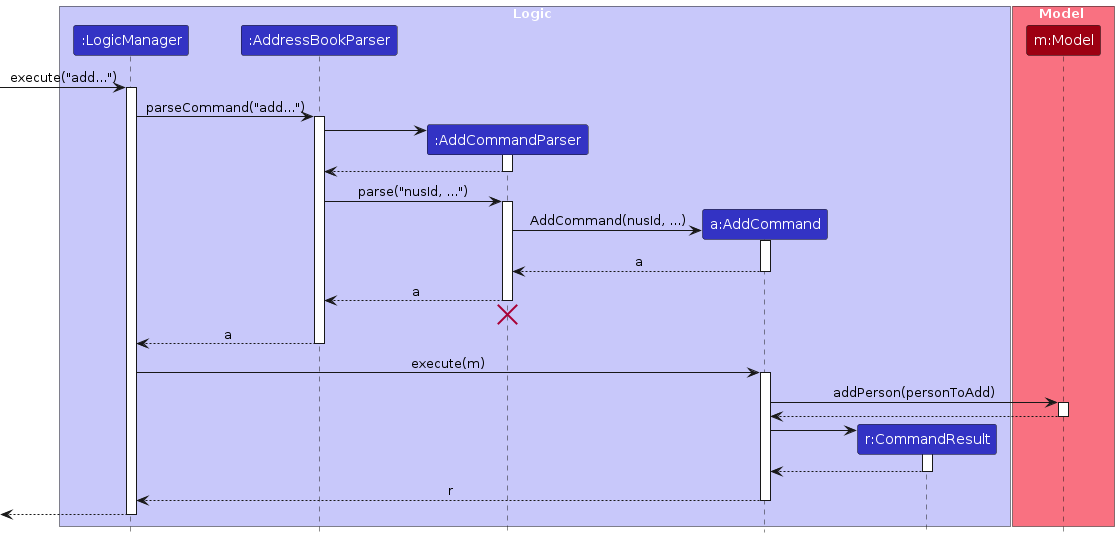
Step 1. The user executes add command.
Step 2. The AddressBookParser will call parseCommand on the user's input string and return an instance of AddCommandParser.
Step 3. AddCommandParser will call parse which create instances of objects for each of the fields and return an instance of AddCommand.
Step 4. The LogicManager calls the execute method in AddCommand.
Step 5. The execute method in AddCommand executes and calls Model#addPerson() to add the person to the address book.
Step 6. Success message is printed onto the results display to notify user.
Note: If a command fails its execution, it will not call Model#addPerson() and the person will not be added to the address book.
The following sequence diagram shows how an add operation goes through the Logic component:
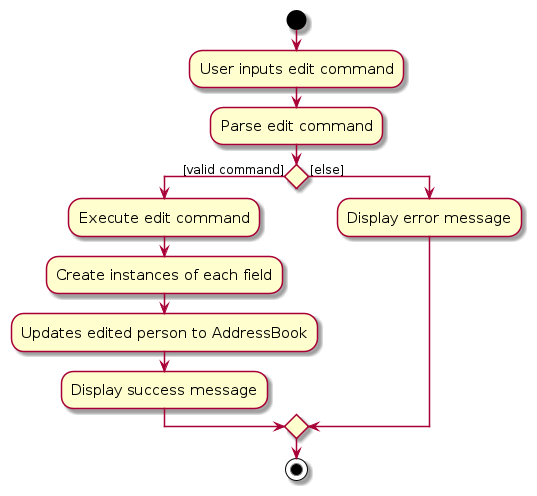
The following activity diagram summarizes what happens when a user inputs an add command:
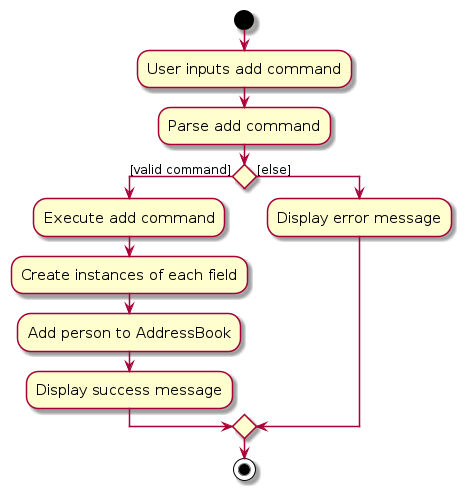
Design considerations:
How add executes
- User inputs an
addcommand withNUSID,name,phone,email,tagsand optionalgroupfields. The inputs are parsed and aAddCommandis created. - The instances of the relevant fields are created and the person is added to the model.
Alternative considerations
- Alternative 1 (current choice): Create instances of objects for each of the fields and add the person to the model.
- Pros: Allow for each field to be validated before adding the person.
- Cons: Additional checks are required.
Delete feature
A person or persons can be deleted using the Delete command. The DeleteCommand class is responsible for handling the deletion of a person/persons. This command is implemented through DeleteCommand which extends the Command class.
A Person can be deleted by specifying NUSID or GROUP.
Implementation
Given below is an example usage scenario and how the DeleteCommand mechanism behaves at each step.
Step 1. The user executes delete command.
Step 2. The AddressBookParser will call parseCommand on the user's input string and return an instance of DeleteCommandParser.
Step 3. DeleteCommandParser will call parse which create instances of objects for each of the fields and return an instance of DeleteCommand.
Step 4. The LogicManager calls the execute method in DeleteCommand.
Step 5. The execute method in DeleteCommand executes and calls Model#deletePerson() to delete the person/persons from the address book.
Step 6. Success message is printed onto the results display to notify user.
Note: If a command fails its execution, it will not call Model#deletePerson() and the person/persons will not be deleted from the address book.
The following sequence diagram shows how a delete operation goes through the Logic component:
The following activity diagram summarizes what happens when a user inputs a delete command:
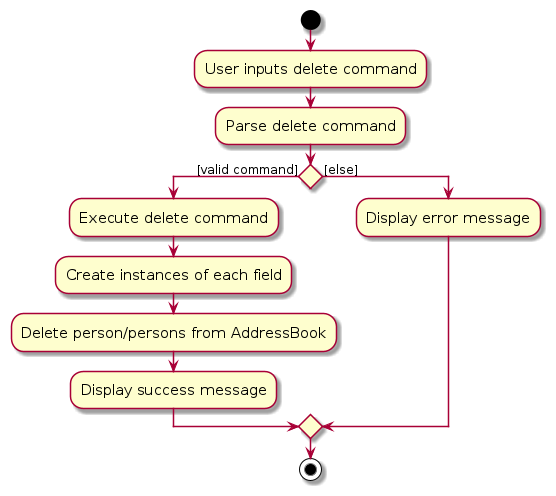
Design considerations:
How add executes
- User inputs an
deletecommand with eitherNUSIDorGROUP. The inputs are parsed and aDeleteCommandis created. - The instances of the relevant fields are created and the person/person are deleted from the model.
Alternative considerations
- Alternative 1 (current choice): Create instances of objects for each of the fields and delete the person/persons from the model.
- Pros: Allow for each field to be validated before deleting the person/persons.
- Cons: Additional checks are required.
- Alternative 2: Creates separate command to delete either specifically a person or everybody from that group.
- Pros: Allow for user to have separate command so that there is a distinct command carrying out a certain functionality, to prevent confusion from the user.
- Cons: More commands are needed for the user to remember.
Edit feature
Implementation
Edit on a person can be done using the edit command. The EditCommand class is responsible for handling the editing of a person's information. This command is implemented through EditCommand which extend the Command class.
A new Edit can be added by specifying a compulsory NUSID, while NAME, PHONE_NUMBER, EMAIL, TAG and GROUP are optional fields but the user needs to enter at least 1 of these optional fields.
Note: Existing values will be replaced by and updated to the new input values.
Given below is an example usage scenario and how the EditCommand mechanism behaves at each step.
Step 1. The user executes Edit command.
Step 2. The AddressBookParser will call parseCommand on the user's input string and return an instance of EditCommandParser.
Step 3. EditCommandParser will call parse which create instances of objects for each of the fields and return an instance of EditCommand.
Step 4. The LogicManager calls the execute method in EditCommand.
Step 5. The execute method in EditCommand executes and calls Model#getFilteredPersonListWithNusId() to get a list of person in the address book and filter to find the relevant person with the given NUSID.
Step 6. Model#setPerson() is called to update the contact information for that person.
Step 7. Model#updateFilteredPersonList() is called to update the person list.
Step 8. Success message is printed onto the results display to notify user.
Note: If a command fails its execution, it will not call Model#setPerson() and the contact information will not be updated for that person.
The following sequence diagram shows how a schedule operation goes through the Logic component:

The following activity diagram summarizes what happens when a user inputs an Edit command:
Design considerations:
How edit executes
- User inputs a
Editcommand withNUSID, and at least 1 of these optional fields:NAME,PHONE_NUMBER,EMAIL,TAGandGROUP. The inputs are parsed and aEditCommandis created. - A list of persons is retrieved from
modeland the relevant person is found by matchingNUSID. - The relevant fields are updated for the person and the person is set back into the model.
Alternative considerations
- Alternative 1 (current choice): Create instances of objects for each of the fields and edits the person's contact information to the model.
- Pros: Allow for each field to be validated before editing the person.
- Cons: Additional checks are required.
Schedule feature
Implementation
Schedule for a person can be added or removed using the schedule command. The ScheduleCommand class is responsible for handling the scheduling of events for a person. This command is implemented through ScheduleCommand which extends the Command class.
A new Schedule can be added by specifying NUSID, schedule and remark. If the schedule and remark prefixes are not specified, the schedule will be removed instead.
Note: schedule and remark are either both present or absent.
Given below is an example usage scenario and how the ScheduleCommand mechanism behaves at each step.
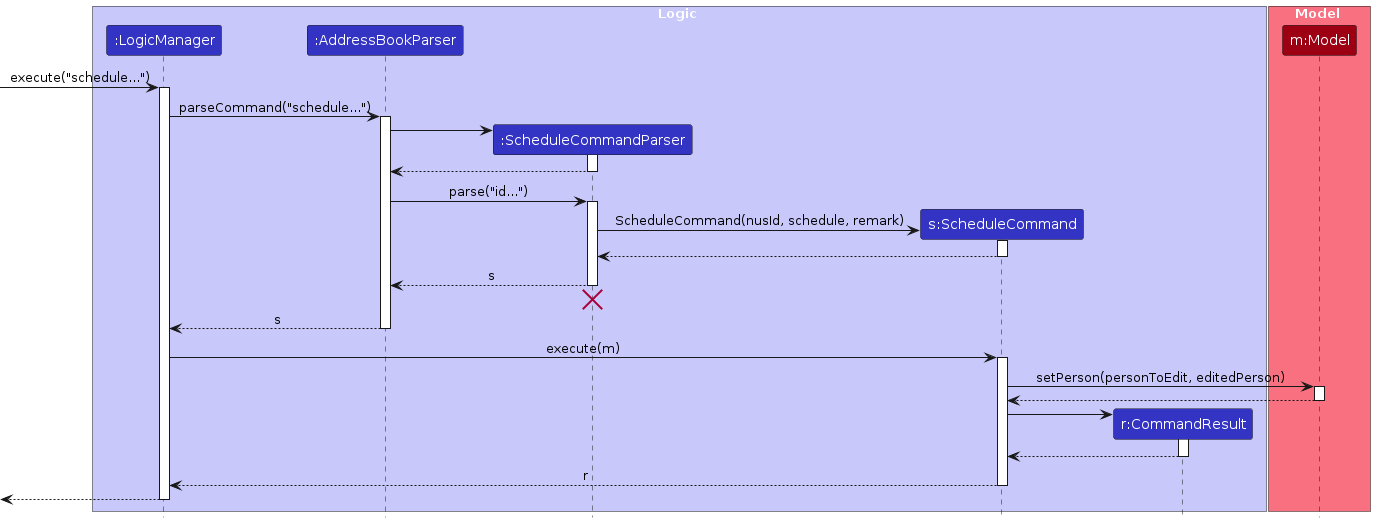
Step 1. The user executes Schedule command.
Step 2. The AddressBookParser will call parseCommand on the user's input string and return an instance of ScheduleCommandParser.
Step 3. ScheduleCommandParser will call parse which create instances of objects for each of the fields and return an instance of ScheduleCommand.
Step 4. The LogicManager calls the execute method in ScheduleCommand.
Step 5. The execute method in ScheduleCommand executes and calls Model#getFilteredPersonList() to get a list of person in the address book and filter to find the relevant person with the given NUSID.
Step 6. Model#setPerson() is called to update the schedule for that person.
Step 7. Success message is printed onto the results display to notify user.
Note: If a command fails its execution, it will not call Model#setPerson() and the schedule will not be updated for that person.
The following sequence diagram shows how a schedule operation goes through the Logic component:
The following activity diagram summarizes what happens when a user inputs a schedule command:
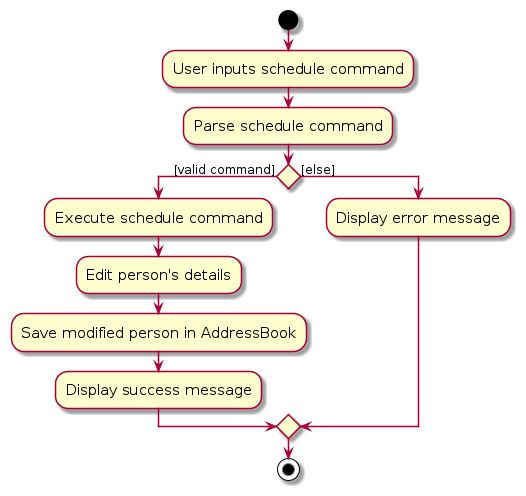
Design considerations:
How schedule executes
- User inputs a
Schedulecommand withNUSID,scheduleandremark. The inputs are parsed and aScheduleCommandis created. - A list of persons is retrieved from
modeland the relevant person is found by matchingNUSID. - The relevant fields are updated for the person and the person is set back into the model.
Why is it implemented this way?
- The functionality of adding and removing schedule is similar to the
EditCommand. Both require changes in thePersonobject. - Hence, the approach is similar to how
editcommand works.
Alternative considerations
Alternative 1 (current choice): Set the schedule for the person by indicating
scheduleandremark, otherwise remove schedule.- Pros: Easy to implement.
- Cons: Additional checks are required to check if it is an add or remove schedule command.
Alternative 2: Introduce add schedule and remove schedule command as separate commands.
- Pros: There is usage of Single Responsibility Principle.
- Cons: We must ensure that the implementation of each individual command are correct.
Alternative 3: Since schedule and edit commands are similar, we could consider adding a generic class which both extend from.
- Pros: It follows the DRY principle.
- Cons: We must ensure that the implementation of each individual command are correct.
Find feature
A Person has many details one may query for, this command searches for contacts that matches all the given details.
Currently, this command supports finding by NUSID, name, phone, email, groups, tag fields.
Note: find requires at least one field mentioned above to be an input
Given below is an example usage scenario and how the find mechanism behaves at each step.
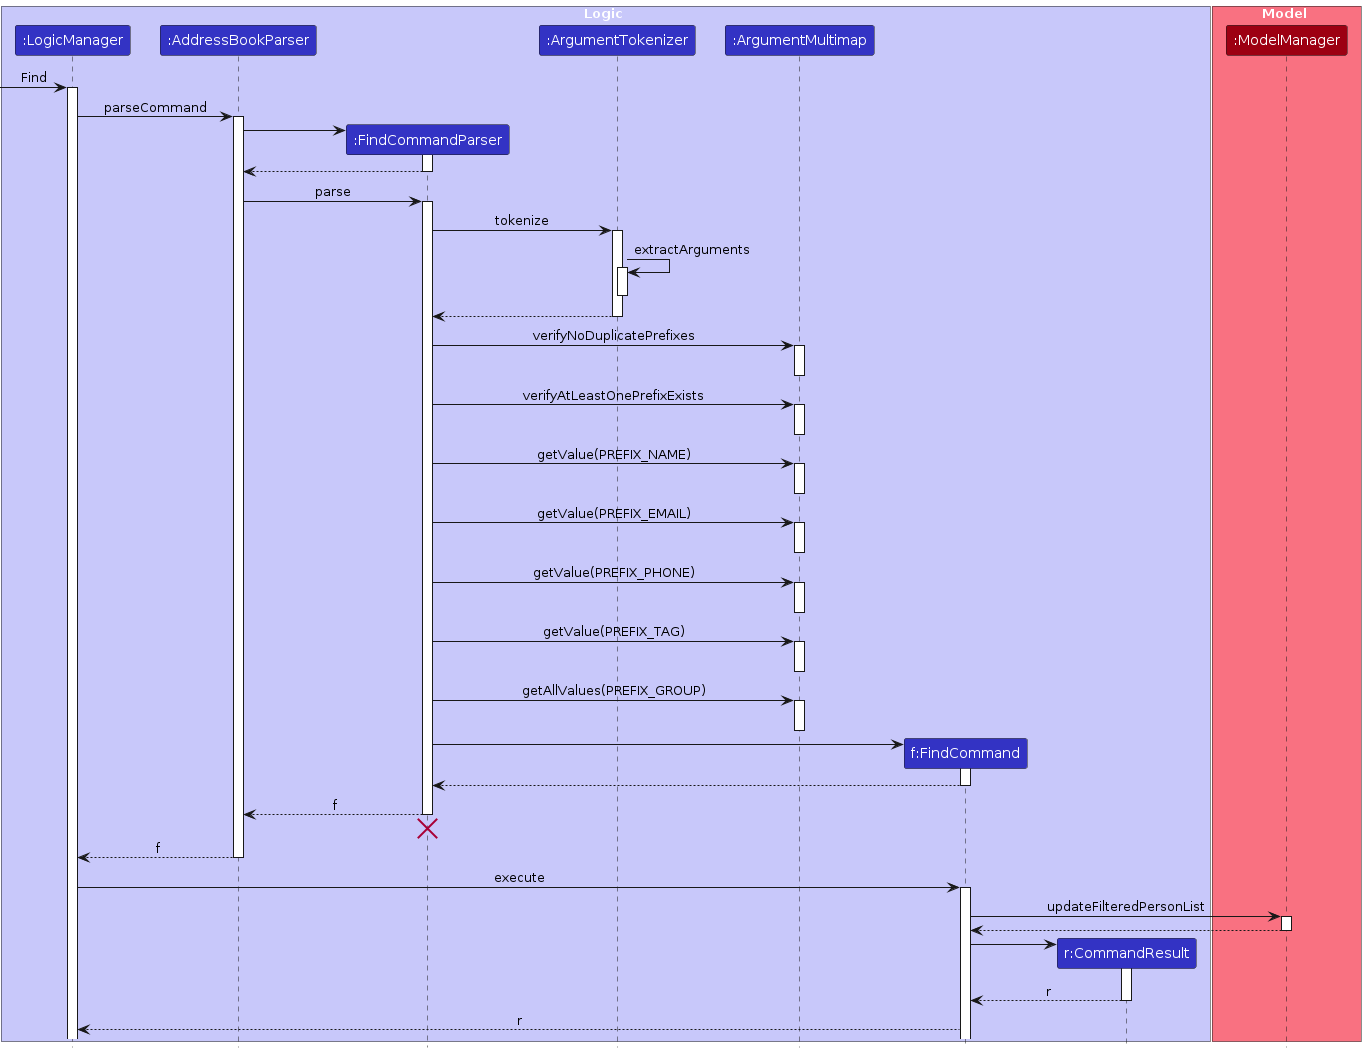
Step 1. The user executes find command.
Step 2. The AddressBookParser will call parseCommand on the user's input string and return an instance of FindCommandParser.
Step 3. FindCommandParser will call parse which create instances of objects for each of the fields and return an instance of FindCommand.
Step 4. The LogicManager calls the execute method in FindCommand.
Step 5. The execute method in FindCommand executes and finds the relevant person(s) with the given fields.
Step 6. Model#updateFilteredPersonList() is called to update the list of persons displayed in AronaPro.
Step 7. Success message is printed onto the results display to notify user.
Note: If a command fails its execution, it will not call Model#updateFilteredPersonList() and the list of persons displayed remains the same.
Note: If a command finds no person, it will display an empty list and not an error message.
The following sequence diagram shows how a find operation goes through the Logic component:
The following activity diagram summarizes what happens when a user inputs a find command:
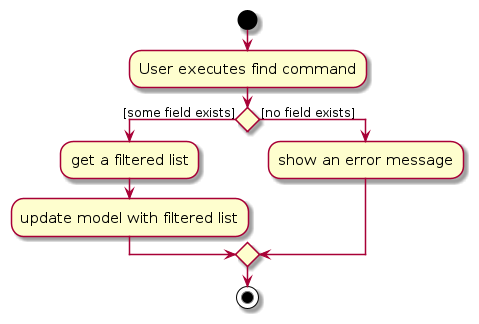
Design considerations:
How find executes
- User inputs a
findcommand with at least one of the fieldsNUSID,name,phone,email,grouportag. The inputs are parsed and aFindCommandis created. - Each of these fields are made into Java
Predicateswhich checks if each field's input matches any person's field (Choice of matching can be changed flexibly in each field's correspondingPredicateclass) in AronaPro. - If any field was not required by the user, a special string (not possible for the user to type when using the add or edit commands) is used to default the
Predicateto True. - A list of persons is created by chaining these
Predicatesusing logicalAND. A list of relevant person(s) are found. - The relevant persons are used to update the person list which the model displays.
Why is it implemented this way?
- The functionality of find is advertised as finding people that matches ALL the supplemented fields. As such logical AND search is relevant to our case.
- Use of predicates is also easily extendable, requiring future programmers to simply create a new
Predicatefor new fields and chaining it with the existing predicates - The use of a special string to denote a non-specified field, while rudimentary, avoids the hassle required to juggle Java
Optionals and less transparent Functional Programming paradigms.
Alternative considerations
Alternative 1 (current choice): Set non-required fields to a special string that makes a field match everyone, otherwise filter based on the input.
- Pros: Easy to implement.
- Cons: If the user is able to enter this special string in
addoreditcommands, it could result in unexpected behaviour.
Alternative 2: Introduce Java
Optionals to determine which fields are required.- Pros: There is usage of Single Responsibility Principle. (Current implementation has
Predicateimplicitly handling added responsibility of checking optionality) - Cons: Harder to debug when using Functional Programming paradigms while passing results across classes.
- Pros: There is usage of Single Responsibility Principle. (Current implementation has
Pin feature
Pin for a person can be done using the pin command. The PinCommand class is responsible for handling the addition of a person. This command is implemented through PinCommand which extend the Command class.
A Person can be pinned by specifying NUSID.
Implementation
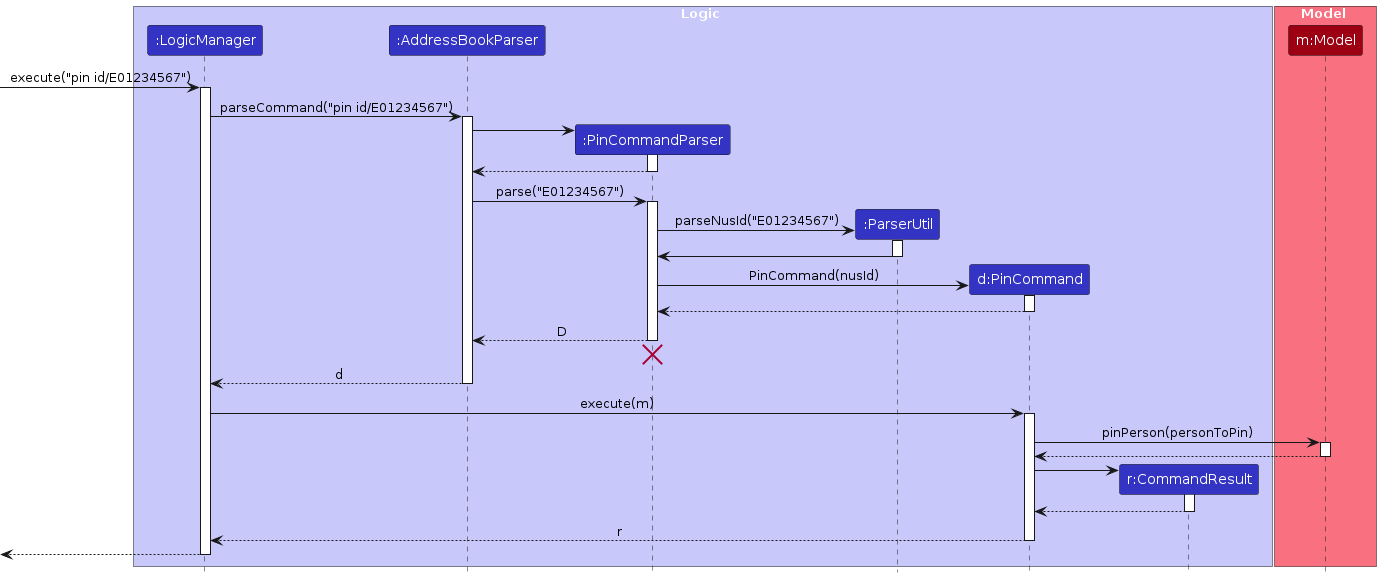
Given below is an example usage scenario and how the PinCommand mechanism behaves at each step.
Step 1. The user executes pin command.
Step 2. The AddressBookParser will call parseCommand on the user's input string and return an instance of PinCommandParser.
Step 3. PinCommandParser will call parse which create instances of objects for each of the fields and return an instance of PinCommand.
Step 4. The LogicManager calls the execute method in PinCommand.
Step 5. The execute method in PinCommand executes and calls Model#pinPerson() to add the person to the address book.
Step 6. Success message is printed onto the results display to notify user.
Note: If a command fails its execution, it will not call Model#pinPerson() and the person will not be added to the address book.
The following sequence diagram shows how a pin operation goes through the Logic component:
The following activity diagram summarizes what happens when a user inputs a pin command:
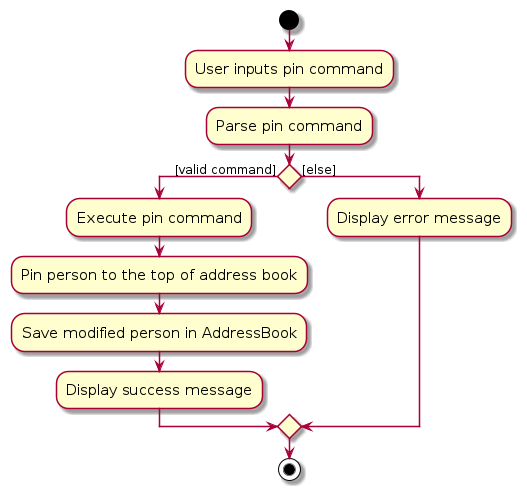
Design considerations:
How Pin executes
- User inputs a
pincommand withNUSID.The inputs are parsed and aPinCommandis created. - The instances of the relevant fields are created and the person is added to the model.
Group feature
Group for a person can be added using the group command. The GroupCommand class is responsible for handling the grouping and the tagging of a person. This command is implemented through GroupCommand which extends the Command class.
A new Person can be grouped by specifying NUSID and either group and/or tag.
Note: There needs to be at least one group and/or tag keyword.
Note: More than one NUSID keyword can be used if grouping more than one person at once.
Implementation
Given below is an example usage scenario and how the GroupCommand mechanism behaves at each step.
Step 1. The user executes group command with NUSID, group and tag.
Step 2. The AddressBookParser will call parseCommand on the user's input string and return an instance of GroupCommandParser.
Step 3. GroupCommandParser will call parse which create instances of objects for each of the fields and return an instance of GroupCommand.
Step 4. The LogicManager calls the execute method in GroupCommand.
Step 5. The execute method in GroupCommand executes and creates a list of Persons personToGroup. It then calls Model#setPerson() on all Persons in the list to modify the group and tag fields of the Persons in the address book.
Step 6. Success message is printed onto the results display to notify user.
Note: If a command fails its execution, it will not call Model#setPerson() and the Persons will not be grouped in the address book.
The following sequence diagram shows how a group operation goes through the Logic component:
Design considerations:
How group executes
- User inputs an
groupcommand withNUSIDand eithertagsand/orgroupfields. The inputs are parsed and aGroupCommandis created. - The instances of the relevant fields are created and the person(s) is/are grouped in the model.
Documentation, logging, testing, configuration, dev-ops
Appendix: Requirements
Product scope
Target user profile:
- Tech-savvy university Computer Science teaching assistants and professors
- Manages an array of students, professors and students' contacts
- Appreciates an organised approach to query, and manage contacts with CLI
- Prefers desktop apps over other types
- Prefers typing to mouse interactions
- Someone who is reasonably comfortable using CLI application
Value proposition: Manage contacts faster than a typical mouse/GUI driven app
User stories
Priorities: High (must have) - * * *, Medium (nice to have) - * *, Low (unlikely to have) - *
| Priority | As a … | I want to … | So that I can… |
|---|---|---|---|
* * * | new user | see usage instructions | refer to instructions when I forget how to use the App |
* * * | Teaching Assistant | add a new student, prof, TA | know how to contact them |
* * * | user | delete a person | remove entries that I no longer need |
* * * | Teaching Assistant | find a student by name or class | locate details of persons without having to go through the entire list |
* * * | Teaching Assistant | group students into classes | know which class my student is in |
* * * | Teaching assistant | find my supervisor(s) | Report any admin issues my students would raise |
* * * | University student with different friend groups | tag or categorize my contacts | Search by the friend groups I'm concerned with |
* * * | Teaching Assistant who wants to meet up with Profs and students | schedule events to do so | remind myself to meet up or know my free times. |
* * * | Teaching Assistant with important people to report to or stay in contact with | pin important contacts | |
* * * | Teaching Assistant who needs to announce information to his students | copy a (group of) student(s)' contact info onto my clipboard | announce a message efficiently to many students |
* * | Forgetful Teaching Assistant | have a check for addition of duplicate contacts | can reduce clutter of my list |
* * | Teaching assistant who might mistype | have a Confirm Delete warning when doing deletions | provide a safety net in case I accidentally delete important info |
* * | Teaching assistant with many students | personalise contacts with photos | attribute names to faces and distinguish similar names. |
* * | user | hide private contact details | minimise chance of someone else seeing them by accident |
* | user with many persons in the address book | sort persons by name | locate a person easily |
* | detail-oriented Teaching Assistant | add a note with additional information about the contact | remind myself of things I may need to follow up on |
* | Teaching assistant who tires from work | use an app with a cheerful interface | feel encouraged / at peace |
* | Teaching assistant | import and export contact details to/from the app | can easily shift to using this app, or another |
Use cases
(For all use cases below, the System is the AddressBook and the Actor is the user, unless specified otherwise)
Use case: View all contacts
MSS
User requests to view all contacts.
AddressBook shows a list of contacts added.
Use case ends.
Extensions
1a. User uses the wrong format in his request.
1a1. AddressBook shows an error message.
1a2. User uses the correct format as shown in the error message for his request.
Use case resumes at step 2.
Use case: Add a contact
MSS
User requests to add a contact.
User inputs all information required to add a contact into AddressBook.
AddressBook adds the contact with all relevant information into a list.
Use case ends.
Extensions
2a. The given information is in an incorrect format.
2a1. AddressBook shows an error message.
Use case resumes at step 1.
2b. The given information is insufficient to form a contact.
2b1. AddressBook shows an error message.
Use case resumes at step 1.
Use case: Edit a contact's information
MSS
User requests to edit a contact.
User inputs new information about the fields he wishes to edit about a specified contact.
AddressBook edits the contact by changing all the specified fields into the newly inputted information.
Use case ends.
Extensions
2a. The given information is in an incorrect format.
2a1. AddressBook shows an error message.
Use case resumes at step 1.
2a. The contact does not exist.
2a1. AddressBook shows an error message.
Use case ends.
Use case: Delete a contact
MSS
User requests to delete a specific contact.
AddressBook deletes the specified contact.
Use case ends.
Extensions
1a. User uses the wrong format in his request.
1a1. AddressBook shows an error message.
1a2. User uses the correct format as shown in the error message for his request.
Use case resumes at step 2.
2a. The contact does not exist.
2a1. AddressBook shows an error message.
Use case ends.
Use case: Find some specific contact(s)
MSS
User requests to find some contact(s).
AronaPro outputs the contact(s) with all relevant information about the contact.
Use case ends.
Extensions
1a. User uses the wrong format in his request.
1a1. AronaPro shows an error message.
1a2. User uses the correct format as shown in the error message for his request.
Use case resumes at step 2.
2a. The contact does not exist.
2a1. AronaPro shows an empty list, informing that no contacts were found.
Use case ends.
Use case: Assign an existing contact to a tutorial group
MSS
User requests to tag a specific contact to a tutorial group.
AddressBook tags the contact to the tutorial group.
Use case ends.
Extensions
1a. User uses the wrong format in his request.
1a1. AddressBook shows an error message.
1a2. User uses the correct format as shown in the error message for his request.
Use case resumes at step 2.
2a. The contact does not exist.
2a1. AddressBook shows an error message.
Use case ends.
2a. The tutorial group does not yet exist.
2a1. AddressBook creates a new tag with the name of the tutorial group.
Use case resumes at step 2.
Use case: Classify an existing contact (Prof, TA, Student)
MSS
- User requests to classify a specific contact.
- AddressBook classifies the contact as either a Professor, TA or Student.
Extensions
1a. User uses the wrong format in his request.
1a1. AddressBook shows an error message.
1a2. User uses the correct format as shown in the error message for his request.
Use case resumes at step 2.
2a. The contact does not exist.
2a1. AddressBook shows an error message.
Use case ends.
2a. The tag does not exist.
2a1. AddressBook shows an error message.
2a2. User has to request the classification again using a correct classifier.
Use case resumes at step 1.
Use case: Schedule an event with a contact
MSS
- User requests to schedule an event with a specific contact.
- User inputs all necessary information into AddressBook in order for the event to be scheduled.
- AddressBook creates the event and classifies it under the contact.
Extensions
1a. User uses the wrong format in his request.
1a1. AddressBook shows an error message.
1a2. User uses the correct format as shown in the error message for his request.
Use case resumes at step 2.
2a. The contact does not exist.
2a1. AddressBook shows an error message.
2a2. User inputs an existing contact as required in the error message for his request.
Use case resumes at step 2.
2a. The information required is not sufficiently inputted.
2a1. AddressBook shows an error message.
2a2. User has to request the classification again using a correct classifier.
Use case resumes at step 1.
Use case: Delete a group of people
MSS
- User requests to delete all people in a specific group.
- User inputs the name of the group into the AddressBook.
- AddressBook deletes all people that are classified under the specified group.
Extensions
1a. User uses the wrong format in his request.
1a1. AddressBook shows an error message.
1a2. User uses the correct format as shown in the error message for his request.
Use case resumes at step 2.
2a. The group does not exist.
2a1. AddressBook shows an error message.
Use case ends.
Use case: Pin a contact
MSS
User requests to pin a specific contact.
AddressBook pins the specified contact.
Use case ends.
Extensions
1a. User uses the wrong format in his request.
1a1. AddressBook shows an error message.
1a2. User uses the correct format as shown in the error message for his request.
Use case resumes at step 2.
2a. The contact does not exist.
2a1. AddressBook shows an error message.
Use case ends.
Non-Functional Requirements
- Should work on any mainstream OS as long as it has Java
11or above installed. - Should be able to hold up to 1000 persons without a noticeable sluggishness in performance for typical usage.
- A user with above average typing speed for regular English text (i.e. not code, not system admin commands) should be able to accomplish most of the tasks faster using commands than using the mouse.
- A novice user should be able to learn basic operations (add, delete, search entries) within 30 minutes of using the documentation.
- The system should respond within two seconds.
- The system should be backward compatible with data produced by earlier versions of the system.
- The system should smoothly handle user input errors and system issues, providing meaningful error messages without crashing.
- Comply with relevant data protection regulations, Personal Data Protection Act (PDPA) in handling personal information.
- Adhere to recommended coding standards, such as readability, modularity, and application of design patterns, to make upgrades and maintenance simpler.
Glossary
- Teaching Assistant (TA): A student-tutor hired by NUS. TAs are responsible for conducting tutorial lessons and assist in the students' learning whenever required.
Appendix: Instructions for manual testing
Given below are instructions to test the app manually.
Note: These instructions only provide a starting point for testers to work on; testers are expected to do more exploratory testing.
Launch and shutdown
Initial launch
Download the jar file and copy into an empty folder.
cd into that folder and execute the command
java -jar AronaPro.jar.
Expected: Shows the GUI with a set of sample contacts. The window size may not be optimum.
Saving window preferences
Resize the window to an optimum size. Move the window to a different location. Close the window.
Re-launch the app by double-clicking the jar file.
Expected: The most recent window size and location is retained.
{ more test cases … }
Example: Deleting a person
Deleting a person with a specified `while all persons are being shown.
Prerequisites: List all persons using the
listcommand. Multiple persons in the list.Test case:
delete id/E0123456
Expected: First contact is deleted from the list. Details of the deleted contact shown in the status message. Timestamp in the status bar is updated.Test case:
delete id/E0000000
Expected: No person is deleted. Error details shown in the status message. Status bar remains the same.Other incorrect delete commands to try:
delete,delete id/x,...(where x is NUSID which does not exist currently in the address book)
Expected: Similar to previous.
{ more test cases … }
Saving data
Dealing with missing/corrupted data files.
Open a command terminal,
cdinto the folder you put the jar file in, and delete the data filedata/addressbook.json.
Expected: The app should create a new data file with default data when it is launched.Open the data file
data/addressbook.jsonin a text editor and delete some lines from the middle of the file.
Expected: The app should show an error message and starts with an empty AronaPro.
{ more test cases … }